How to Create Useful PhotoSignal Alerts
Creating an alert is easy. Creating a useful alert takes a little more thought. A useful alert is not just a random weather threshold. It connects a location, a photographic outcome, the conditions that support that outcome, and the time window during which those conditions actually matter.
The goal is not to create as many alerts as possible. That way lies notification soup. The goal is to create alerts that are specific enough to be meaningful, but flexible enough to catch real photography windows before they pass.
1. Start with the photo you want
Start with the photograph you are hoping for, not the forecast value. Most photographers do not think, “I want high cloud above a threshold.” They think, “I want a colourful sunset,” “I want fog in the valley,” or “I want the tide low enough to reveal the foreground.”
Then translate that idea into the signals PhotoSignal can watch:
- Colourful sunrise or sunset: high cloud, limited low cloud, total cloud not too heavy, and a sunrise or sunset timing window. Use "Sun-facing Horizon Open" as separate context when the light path toward the sun matters.
- Fog or mist: Fog possible smart check using signals such as humidity, dew point, visibility, wind, and timing.
- Rain clearing: Rain Clearing smart check, looking for a transition from wet conditions toward a drier window.
- Seascape foregrounds or sand patterns: tide level, wave period, wind, and useful light.
- Moon in the scene: moonrise or moonset timing near sunrise, sunset, twilight, or a custom time.
2. Choose the location
Alerts belong to locations. The same alert will not always make sense everywhere.
A low-tide alert might be useful at one beach but useless at another. A high cloud sunset alert might be worth watching at an open horizon, but it is much less useful at a location where trees, cliffs, buildings, or mountains block the light. Some locations work best at sunrise, while others work best at sunset. Some forest waterfalls might look best during a cloudy day.
Start with the location, then think about which conditions actually matter there. If you know a place well, use that knowledge. PhotoSignal can watch forecasts, but your field experience still matters.
3. Create the alert
- Open the location. Go to the location you want PhotoSignal to watch. Alerts are created for specific locations because each place has its own useful conditions, timing, access, and photographic behaviour.
-
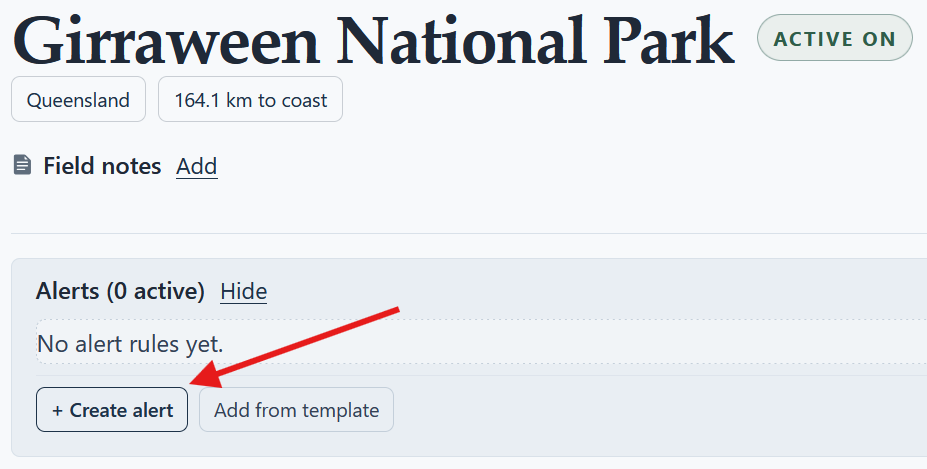
Click Create Alert.
Use the Create Alert button on the location page. This opens the alert builder for that location.
Start from a saved location, then create an alert for the conditions you want PhotoSignal to watch. - Name the alert. Give the alert a name that describes the outcome, not just the data. For example, “Colourful sunset”, “Foggy morning”, “Low tide sand patterns”, or “Moonrise near sunset”.
4. Add conditions
Conditions are the forecast checks that an alert uses. For example, you might add conditions for cloud cover, wind, tide, rain, wave height, moon timing, or other forecast values.
- Understand that conditions work together using AND. Conditions inside one alert are combined together. In practical terms, this means the alert triggers only when all conditions match within the timing window.
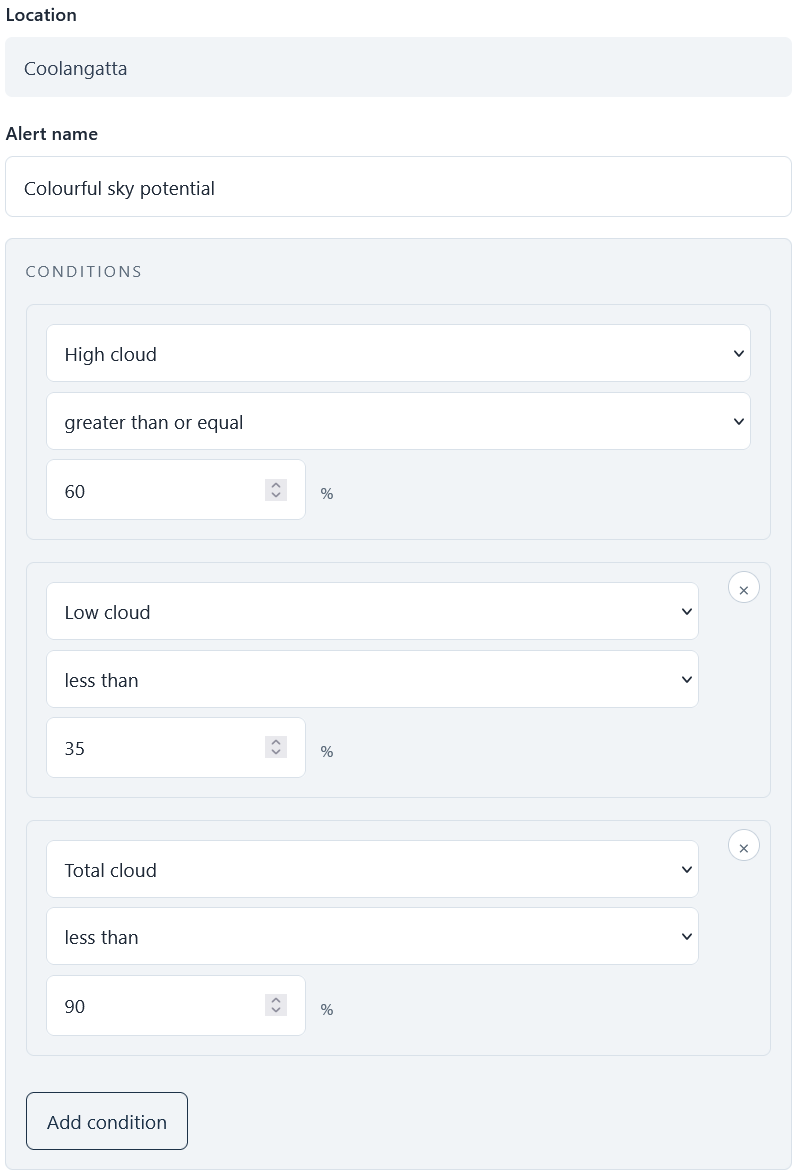
- Stack conditions to describe the full situation. For example, a colourful sunset alert might require high cloud, low cloud below a limit, and total cloud below a heavy-overcast threshold. If one of those conditions fails, the alert does not trigger.
- Use basic conditions for simple thresholds. Basic conditions are useful when a forecast value can be compared against a threshold. For example: high cloud above a percentage, wind below a speed, tide below a level, or wave period above a value.
- Use Smart Checks for calculated patterns. Some photography situations are not just a single forecast value. Rain clearing is not the same as “rain equals zero”. Fog possible is not just “humidity above a number”. Moonrise near sunset is not just a generic moon value.
- Choose the right type of condition for the job. Smart Checks are useful when PhotoSignal needs to detect a pattern, not just compare one forecast value against a threshold. Basic conditions are useful when a simple value check, or a few stacked value checks are enough.
Smart Checks are prebuilt condition checks for common photography situations, such as Fog possible, Rain Clearing, Frost Likely, or moonrise and moonset timing. They include prebuilt conditions and custom calculations for situations where PhotoSignal needs to detect a pattern rather than just compare a forecast value against a threshold.
5. Add timing windows
Timing windows tell PhotoSignal when to check an alert. This matters because many photography conditions are only useful at certain times.
High cloud at 2pm may not matter. High cloud around sunset might. Fog in the middle of the night may not be useful if it disappears before sunrise. Tide conditions may only matter if they line up with the light you want.
- Timing windows work together using OR.
Timing windows work like alternatives: the alert can match in the sunrise, sunset, or another custom window you add. An alert can have multiple timing windows. Timing windows work like alternatives: the alert can match in the sunrise, sunset, or another custom window you add.
Conditions narrow the alert. Timing windows give the times when those conditions should be checked.
- Choose the anchor time.
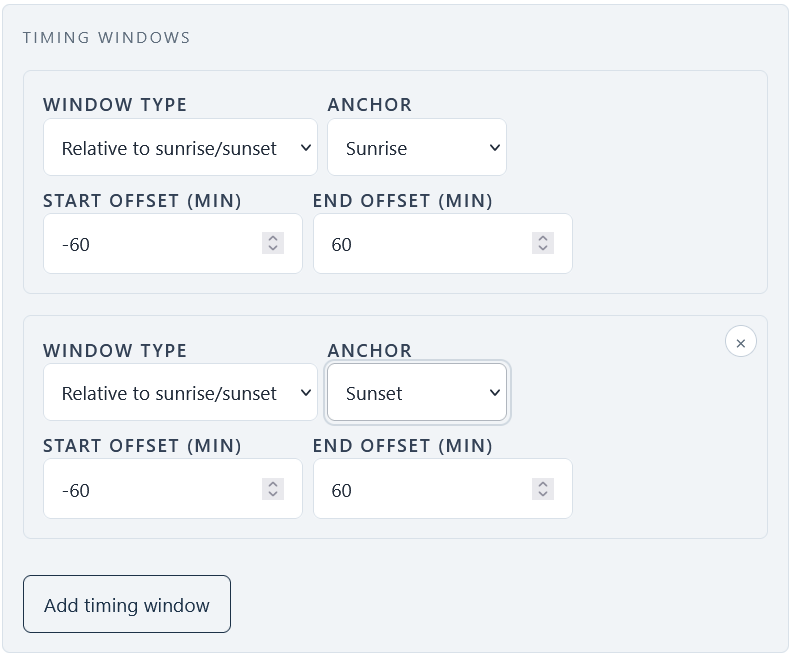
A timing window can be based around an anchor such as sunrise, sunset, or a custom time. Choose the anchor that matches the photography situation.
If you are watching for colour, sunrise or sunset usually makes sense. If you are planning a tide-based seascape, you might be interested in a specific custom window. If you are watching moon timing, the moon event itself may be the thing you want to line up with sunrise, sunset, or twilight.
- Set the range around the anchor.
The range controls how far before and after the anchor PhotoSignal should check. A narrow window is more specific. A wider window gives the forecast more room to match.
For example, checking high cloud from one hour before sunset to half an hour after sunset is very different from checking the entire afternoon. One is a photography window. The other is a vague hope wearing a weather costume.
- Use multiple timing windows when needed.
Some alerts make sense at more than one time. A high cloud alert may be useful around both sunrise and sunset. A wave height alert may be useful at a custom time, as well as at sunrise or sunset. For a wider range, you may use Day/Night windows. For example, a fog alert might be useful all day long, while KP-index alerts make more sense at night.
If the same conditions apply at multiple times, use multiple timing windows rather than creating several nearly identical alerts.
6. Use templates
- Start from a prebuilt template
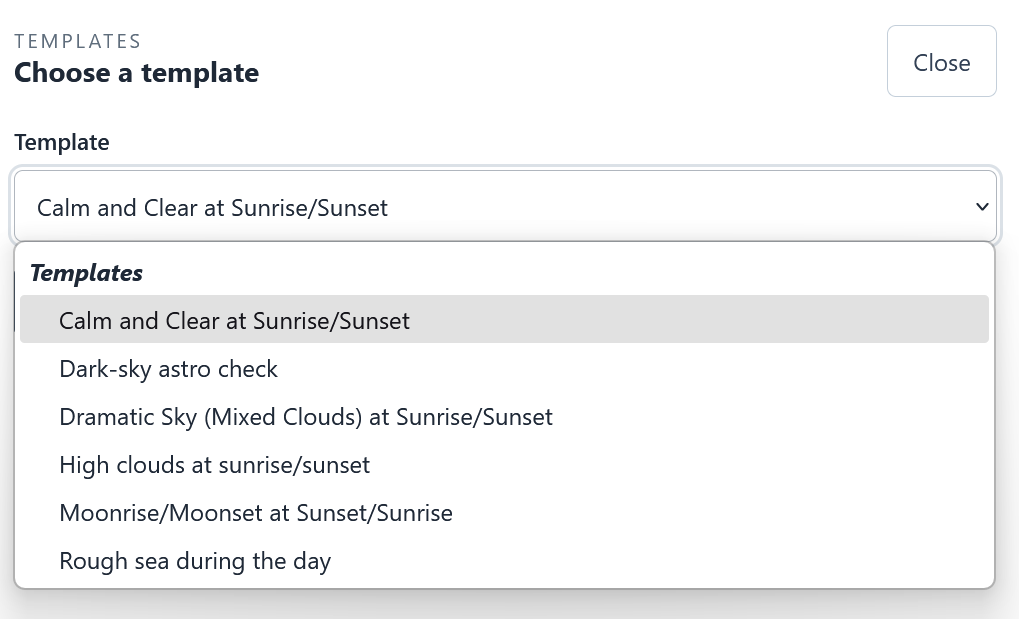
Alert templates give you a head start on building useful alerts for common photography situations. Templates are the fastest way to start. The button is next to the "Create Alert" button (see the screenshot at the top of this article). They are prebuilt alert rules for common photography situations, such as foggy mornings, rain clearing, high cloud, or other useful setups.
Choose a template when it is close to what you want. Apply it to the location, then review the conditions and timing windows before saving.
- Adjust the template for your location
A template is just a starting point. Change the timing window. Tighten or loosen the thresholds. Remove conditions that do not matter for that location. Add conditions if the template is too broad.
Templates save you from having to build the same basic structure over and over, but the most useful version is usually the one you tune for your own locations.
- Save your own template
If you build an alert setup that you want to reuse, save it as your own template. This is useful when you monitor similar conditions across multiple beaches, forests, lookouts, waterfalls, or coastal spots.
7. Example alert recipes
These are not perfect universal settings. Treat them as starting points. The useful numbers will depend on the location, season, forecast model, and the kind of photograph you want.
Colourful sunrise or sunset recipe
If you want colour around sunrise or sunset, you are usually looking for clouds that can catch light, without too much low cloud blocking the horizon.
- Outcome: colour around sunrise or sunset.
- Useful signals: high cloud, limited low cloud, total cloud not too heavy.
- Conditions: high cloud above your chosen threshold, low cloud below your chosen threshold, and total cloud below a heavy-overcast threshold.
- Timing window: around sunrise or sunset.
- Optional: check Sky Context if available, especially for horizon gaps and nearby cloud structure.
The colourful sunrise and sunset alert guide walks through a fuller cloud-layer setup for this recipe. The Sun-facing Horizon Open guide explains the separate horizon-context alert.
Foggy morning recipe
If you want fog or mist, do not try to build the whole thing from one humidity threshold. Fog is a pattern.
- Outcome: fog or mist near sunrise.
- Useful signals: humidity, dew-point spread, visibility, wind, timing, and local terrain.
- Condition: Fog possible smart check.
- Timing window: around sunrise or early morning.
- Optional: add additional limits if the location requires them, such as wind below a certain speed.
The fog alert guide shows how to turn this recipe into a saved alert.
Rain clearing recipe
If you want dramatic light after rain, the useful part is the transition. You want rain before the window, then easing or dry conditions near the time you might shoot.
- Outcome: dramatic light after rain.
- Useful signals: recent rain, rain easing, dry or near-dry target window, and cloud remaining.
- Condition: Rain Clearing smart check.
- Timing window: around sunrise or sunset.
- Optional: combine with cloud conditions if you want rain clearing with a more interesting sky.
Low-tide sand patterns recipe
If you want sand patterns, exposed rocks, tidal pools, or reflections, the tide is only part of the setup. Wave period, wind, and light still matter.
- Outcome: exposed sand patterns, rock shapes, pools, or reflections.
- Useful signals: low tide, suitable wave period, manageable wind, and useful light.
- Conditions: tide below your chosen level, wave period above your chosen value, wind below your chosen limit, and optional cloud conditions.
- Timing window: around sunrise, sunset, or a custom tide-focused window.
- Optional: save different versions for different beaches, since useful tide levels can vary a lot by location.
Moonrise near sunset recipe
If you want the moon in the scene, start with timing. The alert can help you notice the window, but exact alignment still depends on direction, elevation, and composition.
- Outcome: Moon visible as part of the scene.
- Useful signals: moonrise or moonset timing, moon phase, sky clarity, and light window.
- Condition: Moonrise or Moonset smart check.
- Timing window: sunset, sunrise, twilight, or a custom time.
- Optional: use a separate map-based planner for exact moon alignment with a landmark, mountain, tree, or headland.
8. Think about alert noise
Alert noise is what happens when alerts fire too often, too vaguely, or for conditions you do not actually care about. It is worth thinking about early, because noisy alerts train you to ignore the system.
- Too broad
An alert is too broad when it triggers for situations you would not realistically act on.
For example, “cloud cover above 20%” is probably too broad for sunrise or sunset photography. It might be true often, but it does not say much about whether the sky is interesting, whether the horizon is open, or whether the scene is likely to get any colour.
- Too strict
An alert is too strict when it almost never triggers, or only triggers for an idealised forecast that rarely exists in the real world.
Forecasts are messy. If every value must be perfect, you may miss useful windows that were imperfect but still worth checking.
- Useful enough to act on
A useful alert gives you a reason to look closer. It does not need to guarantee a successful shoot. It should simply say: this location and time window may be worth checking.
That is the practical target. Not perfect. Useful.
9. Choose how you want to be notified
Alerts are only useful if they reach you at the right time. PhotoSignal can notify you when a forecast window is coming up, when it is getting close, or when a previously promising window no longer matches.
The early notification helps you plan. The later notification helps you decide whether the window is still worth acting on. A cancellation helps you avoid chasing a forecast that has already fallen apart.
If you receive too many individual messages, use digest mode to group notifications together. If you prefer to know about each alert as soon as possible, use immediate notifications.
10. Review and adjust after real alerts
The first version of an alert does not have to be perfect. In fact, it probably will not be. That is normal.
After an alert triggers a few times, review whether it was useful. Did it catch real opportunities? Was it too noisy? Too strict? Did it trigger at the wrong time? Did the location need a different tide level, cloud range, or wind threshold?
Adjust the alert as you learn. Remove alerts you do not need. Remove alerts you do not need. Save good setups as templates to reuse across locations.
11. Next steps
Once you understand how useful alerts are built, you can create more specific alert types for the situations you care about most.